
Map your Typeform questions to HubSpot fields in the Create panel
Connect your form to HubSpot and when someone completes your form, it'll automatically create or update contacts in your HubSpot account.
Our native integration lets you map your Typeform questions to Contacts, Companies, and Deals in HubSpot while you create your form in Typeform's Create panel. You can also find a list of supported field mappings here.
Now let’s check out how this could work without ever having to leave the comfort of the Create panel.
Here’s what you’ll need:
- A Free Typeform account
- A HubSpot account
You can jump to the following sections by clicking the links:
- How to create your form with HubSpot in the Create panel
- How to configure your HubSpot settings in the Create panel
- Map Typeform questions to HubSpot Companies & Deals
- Typeform responses in HubSpot
- Edit or delete the integration
Looking for more resources about Typeform and HubSpot? Take a look at the articles below:
- Set up source tracking for HubSpot
- Personalize your forms with HubSpot
- HubSpot integration: Troubleshooting and FAQ
How to create your form with HubSpot in the Create panel
To start creating a form with HubSpot:
1. Open up an existing form or create a new one and click + Add content.
2. Click Create with HubSpot in the header of the screen that appears.
3. You’ll be taken to the HubSpot authentication screen where you’ll have the option to select a previously connected HubSpot account from the dropdown list, or authenticate a new account by clicking the Add new button.
You can associate multiple HubSpot accounts with your Typeform account. Any HubSpot account you have previously connected to Typeform will be listed here. Each unique form can be integrated with one HubSpot account: in other words, you can't integrate the same form with multiple HubSpot accounts. If you can't see the right account when setting up the integration, refer to this HubSpot article on managing multiple accounts.
You won't have to go through the authentication steps again after connecting your first form to HubSpot. If you already have a form integrated with HubSpot, you can select a connected account from the dropdown when integrating your next form.
4. Select the HubSpot Contact property from the list and it'll be added as a question to your form. Questions added here will be mapped to your HubSpot Contacts automatically.
The HubSpot Contact properties listed here are based on the properties you’ve created in HubSpot and are configured to work with forms. These may be different for each account.
5. When you select a HubSpot Contact property from the list, it'll be pre-populated with the question text and the answer options when it’s added to your form. You can also edit the question text, as needed.
In the example below, we selected the HubSpot Contact property Employement Role and it automatically included the question text asking for the respondent's job title.
6. Click Edit choices to view the pre-populated answer options in the dropdown list.
You can edit the choices here, and click Save choices when you’re done.
7. Once you’ve added a question from the Create with HubSpot tab, you’ll also see a green link icon indicating that the question has been mapped to HubSpot.
8. If you want to change the HubSpot field your Typeform question is mapped to, click the dropdown list under Map to and search for or select your preferred option.
You'll see all your HubSpot property types in the Map to dropdown list, even the ones that are not compatible with the Typeform question selected above. This is to prioritize mapping to the desired HubSpot property over the Typeform question type. You can find the full list of compatible field mappings here.
You can also change the Typeform question type by clicking the question type dropdown. Only question types that are compatible with the HubSpot property selected will be shown in the dropdown.
However, if you select a HubSpot property that's not compatible with a question type, the Typeform question type will automatically change to a compatible one. For example, if you select the Phone Number HubSpot property when trying to map to a Short Text question type, the Typeform question type will automatically change to Phone Number, as seen below.
If the HubSpot property you've selected changes the Typeform question type and you have logic applied to that question, you'll receive a warning stating that changing the Contact property will remove the logic for this question. Decide on how you would like to proceed by clicking Cancel or Map and remove logic.
When mapping Endings from the right side panel, you'll only see compatible HubSpot properties.
9. You can also add Typeform questions to your form when you click Add content, however, these questions won’t be pre-populated or mapped to HubSpot fields automatically.
10. If a question hasn’t been mapped to HubSpot properties, the link icon next to HubSpot in the question settings will be grayed out.
11. In this case, you can simply select a property from the dropdown list under Map to. Make sure to select a compatible HubSpot property; check out the list of compatible fields here.
12. Tadaa! Your Typeform question has been linked to the selected HubSpot property, and you can personalize your form however you please. Click Add content and select Create with HubSpot to add more questions to your form, and make sure to click Publish when your form is ready to go live.

Tip! Some of the information you mapped not appearing in HubSpot? Make sure you've clicked Publish on your form to make the latest edits to the integration live.
If you're connecting a form to HubSpot that has existing responses collected, you'll be given the option to send the existing responses to HubSpot when you click Publish on your form.
Here's how sending existing responses to HubSpot works:
- You can only send existing responses to HubSpot when you first set up the integration and click Publish, not when you edit it.
- The number of existing responses that can be sent to HubSpot is 1,000. If a form has more than 1,000 responses, only the most recent 1,000 responses will be backfilled.
- If a response can't be sent to HubSpot (for example, if a respondent enters an invalid email address) only that entry will fail; the other responses will be backfilled.
- Backfilling partial responses is currently not supported.
- Sending existing responses to HubSpot can take a few hours, depending on how many responses you're trying to backfill and how many other users are backfilling at the same time.
- You can select a maximum of three fields to update existing records, for example, First Name, Last Name, and Email.
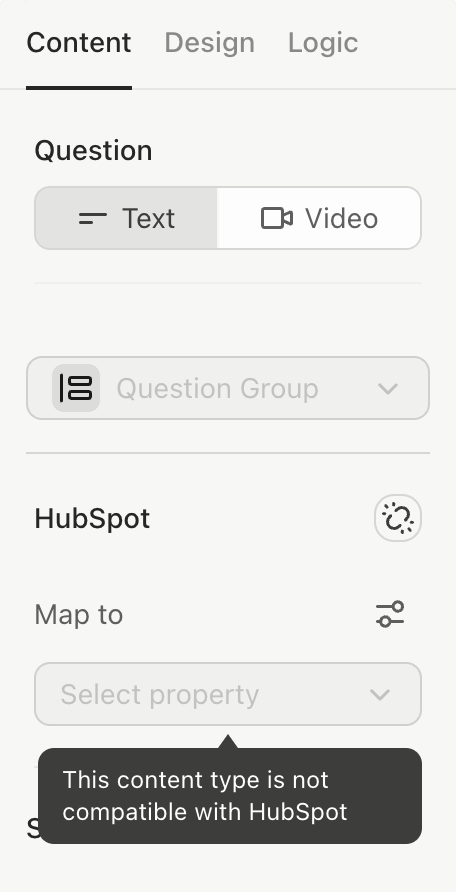
Certain question types are currently not compatible with HubSpot properties. Below are the Typeform elements that can’t be mapped to any HubSpot property:
- Statements
- Calendly
- Payment question - Stripe integration
These fields will be grayed out with a tooltip explaining why you can’t map them to HubSpot properties.
You can, however, map the individual questions within Question Groups and Multi-Question Pages to HubSpot properties.
How to configure your HubSpot settings in the Create panel
To configure your HubSpot settings in the Create panel:
1. Click the HubSpot icon in the toolbar of the Create panel to open up its configuration.
2. In the General tab, you can configure mapping rules and other settings.
3. Toggle the Require email address to create new records switch if you only want to create new records when your respondents submit their email address.
You can also make the Email question required in your form’s question settings to make sure that respondents can’t skip it.
4. If your form includes an email question, the Update existing Contacts based on properties switch will be grayed out. In this case, existing contacts will be updated based on matching email addresses.
5. If your form doesn’t include an email question, you can toggle the Update existing Contacts based on properties switch, and you’ll see the HubSpot properties available in your form.
6. Now you can select the checkboxes for which properties will be used to update existing contacts. If you’ve toggled this switch on, you’re required to choose at least one property, and you can select up to three options.
7. Toggle the Respondent source tracking switch under Other settings to start tracking the source of your respondents.
You can find out what source tracking is and how to set it up here. If you’re an advanced user, you can also read about tracking the source of embedded forms here.
8. Click Map to Contacts to map the existing questions in your form to HubSpot. Here you can map to form elements, like Variables, URL parameters, as well as questions.
Check out this article here to see which HubSpot field is compatible with which Typeform content.
9. Select a HubSpot property from the dropdown list that a form element will be mapped to.
The form elements available here will depend on the content of your form. For example, you can only map the Segment and Score variables to compatible HubSpot properties if your form includes logic based on scoring and segmentation. Only compatible HubSpot properties will appear in the dropdown. You can find out more about scoring and segmenting your leads using logic conditions here.
Similarly, if your form includes URL parameters, you’ll be able to map the URL parameters to HubSpot properties here. Only compatible HubSpot properties will be available to choose from in the dropdown. You can find out what URL parameters are and how to use them in your forms here and here.
10. Under Map questions, you can select the HubSpot properties you want your Typeform questions to be mapped to from the dropdown list. You'll only be able to select compatible HubSpot properties.
11. You can also map to individual answer choices here, and you can use the link icon next to each answer option to unlink it from HubSpot.
12. Click Save when you’re done with setting up your mappings.
Map Typeform questions to HubSpot Companies & Deals
You'll need to have mapped one or more Typeform questions to HubSpot's Contact properties before you can map to HubSpot's Companies & Deals. Then make sure to click publish on your form before mapping to Companies and Deals because you can only map questions that are live to HubSpot.
To map Typeform questions to HubSpot's Companies & Deals:
1. Click the HubSpot icon in the toolbar of the Create panel.
2. Then click Map Companies & Deals.
This will then take you to the Connect panel where you can start mapping your Typeform questions to Companies & Deals in HubSpot.
3. Under Companies or Deals, select a Typeform question from the dropdown and then select the HubSpot field you want to map to from the dropdown.
If you would like to update existing Companies or Deals when you collect new responses, click the checkboxes of the fields you want responses to be compared to.
4. Click Save when you're finished mapping.
Typeform responses in HubSpot
When respondents complete your form, you'll see the new Contacts, Companies, and Deals created in your HubSpot account.
Edit or delete the integration
You can edit the integration by clicking the HubSpot icon in the toolbar in the Create panel.
Or click on a question in the Create panel and edit the mapping in the question settings in the right side panel.
To deactivate the integration, click on the Connect panel. Then next to HubSpot, untoggle the switch to turn off the integration.
You can also click the three dots to Edit or Delete the integration.
You can follow the steps in this HubSpot article to uninstall the Typeform app from your HubSpot account. When disconnecting or uninstalling the integration, your previous submissions and data will remain in HubSpot.